How to Create a Windrose Server Guide: Difference between revisions
(Clean up Windrose+ callout styling and branding) |
(Add Windrose+ guide links to See Also) |
||
| (4 intermediate revisions by the same user not shown) | |||
| Line 5: | Line 5: | ||
Renting from a professional game server provider is the fastest and easiest way to get online. Survival Servers handles hardware, network, DDoS protection, and updates for you. | Renting from a professional game server provider is the fastest and easiest way to get online. Survival Servers handles hardware, network, DDoS protection, and updates for you. | ||
'''Included with Survival Servers: Windrose+''' | <div style="padding:12px 14px; margin:12px 0; border:1px solid #6b4bff; background:#f5f1ff;"> | ||
'''Included with Your Survival Servers Rental: Windrose+''' | |||
<br /> | |||
''No client mods required.'' Official Windrose gives you the default '''8 main server fields''' plus '''9 preset world parameters'''. '''Windrose+''' expands that to '''2,400+ server settings''', adds '''server status''' and '''admin/RCON tools''', and a '''live map''' is coming soon. | |||
<gallery widths="420" heights="236" perrow="2"> | |||
File:Windrose_plus_console_showcase.png|Windrose+ RCON Console | |||
File:Windrose_plus_livemap_showcase.png|Coming Soon: Windrose+ Live Map | |||
</gallery> | |||
</div> | |||
[[File:Windrose_game_server.png|none|link=https://www.survivalservers.com/sspanel/?game=windrose&trckaff=3881&trckit=WIKI]] | [[File:Windrose_game_server.png|none|link=https://www.survivalservers.com/sspanel/?game=windrose&trckaff=3881&trckit=WIKI]] | ||
Latest revision as of 21:27, 15 April 2026
Creating a Windrose game server is an easy process that can be done from either a dedicated server or your home computer. Alternatively, you can choose a Windrose server host that will fit your needs.
Option #1: Renting a Windrose server
Renting from a professional game server provider is the fastest and easiest way to get online. Survival Servers handles hardware, network, DDoS protection, and updates for you.
Included with Your Survival Servers Rental: Windrose+
No client mods required. Official Windrose gives you the default 8 main server fields plus 9 preset world parameters. Windrose+ expands that to 2,400+ server settings, adds server status and admin/RCON tools, and a live map is coming soon.
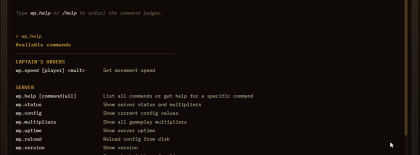
Windrose+ RCON Console
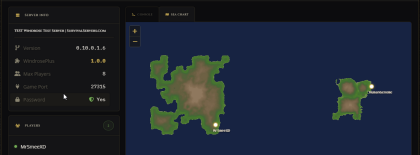
Coming Soon: Windrose+ Live Map


With a rented Windrose server from Survival Servers you get:
- Custom control panel (start/stop/restart, config editor, backups)
- Windrose+ access with no client-side mod installation required
- Live map, server status, and admin/RCON tools
- Easy server-side multipliers for loot, XP, stack size, craft cost, crop speed, and weight
- Full FTP file access
- Custom launch parameters
- Location switching between 8 global datacenters
- DDoS protection
- Instant server setup
Option #2: Host Your Own Windrose Server
Want to run your own Windrose server at home or on your own hardware? This guide will walk you through everything step by step.
What You'll Need
Computer Requirements
| What | Minimum | Recommended |
|---|---|---|
| RAM | 8 GB (2 players) | 12 GB for 4 players, 16 GB for 10 |
| CPU | Modern 64-bit quad-core | Good single-thread performance |
| Storage | 35 GB free space | SSD / NVMe SSD |
| Operating System | Windows 10/11 or Windows Server (64-bit) | Same |
Software Requirements
- Steam client - Install Windrose Dedicated Server from Library -> Tools.
- Visual C++ Redistributables - Included with the server files.
Note: The official dedicated server guide currently recommends up to 4 players for the smoothest experience.
Step 1: Install the Dedicated Server
- Open Steam on the machine that will host the server.
- Open Library -> Tools.
- Find Windrose Dedicated Server and click Install.
- Let Steam finish downloading and updating the server files.
The default install folder is usually inside your Steam library, for example:
SteamLibrary\steamapps\common\Windrose Dedicated Server\
Step 2: Start the Server for the First Time
- Open the server install folder.
- For first boot or troubleshooting, run:
StartServerForeground.bat
- To run it in the background instead, launch:
WindroseServer.exe
The server will start up and create all its configuration files. You'll see text scrolling in the window as it loads.
When the server finishes starting, note the InviteCode shown in the console. Players use that code to join your server.
Step 3: Networking
The current official dedicated server guide says Windrose uses dynamic networking via NAT punch-through / UPnP. In practice, that means:
- You normally do not configure fixed game/query ports manually.
- You normally do not forward
7777/7778like older guides suggest. - If you're hosting at home, keep UPnP enabled on your router if available.
- Make sure Windows Firewall or any host firewall allows Steam and the Windrose dedicated server executables.
If your server does not appear or players cannot join, check the latest official guide first because networking behavior may change during Early Access.
Step 4: Configure Your Server
After the first launch, the server generates configuration files. The main files are:
R5\ServerDescription.json
R5\Saved\SaveProfiles\Default\RocksDB\<game_version>\Worlds\<world_id>\WorldDescription.json
Important: Only edit this file when the server is shut down. The server may automatically overwrite changes if it detects issues.
Players connect with the InviteCode stored in ServerDescription.json or printed in the server console.
See Windrose Server Configuration Guide for detailed configuration options.
Understanding Your Server Files
After running the server, you'll see these folders and files:
| File/Folder | What It Does |
|---|---|
StartServerForeground.bat |
Starts the server with a visible console for logs and troubleshooting. |
WindroseServer.exe |
Starts the dedicated server process. |
R5\ServerDescription.json |
Main server settings (invite code, password, max players). |
R5\Saved\SaveProfiles\Default\RocksDB\<version>\Worlds\<world_id>\WorldDescription.json |
Per-world settings (difficulty, multipliers, world name). |
R5\Saved\Logs\ |
Server logs for troubleshooting. |
Important: Always stop your server before editing configuration files!
Starting and Joining
| Task | What to Use |
|---|---|
| First boot / troubleshooting | StartServerForeground.bat
|
| Background start | WindroseServer.exe
|
| Player connection | Share the InviteCode from the console or ServerDescription.json
|
Updating Your Server
Use Steam to update the Windrose Dedicated Server tool before starting the server again.
Important: Stop your server before updating.
Quick Reference
| Task | How to Do It |
|---|---|
| Install / Update server | Open Steam -> Library -> Tools -> Windrose Dedicated Server
|
| Start with logs | StartServerForeground.bat
|
| Start in background | WindroseServer.exe
|
| Invite players | Share your InviteCode
|
Notes
- Use an SSD.
- The official guide currently recommends up to 4 players for the smoothest performance.
- Stop the server before editing config files.
See Also
- Windrose Server Configuration Guide
- How to Transfer a Local Save to a Windrose Server
- How to Join a Windrose Server
- Windrose Admin Commands
- Windrose on Steam
- Windrose server hosting