How to Create a Hytale Server Guide: Difference between revisions
No edit summary |
|||
| Line 1: | Line 1: | ||
Creating a Hytale game server is an easy process that can be done from either a dedicated server or your home computer. Alternatively, you can choose a [https://www.survivalservers.com/services/game_servers/hytale/ Hytale server host] that will fit your needs. | Creating a Hytale game server is an easy process that can be done from either a dedicated server or your home computer. Alternatively, you can choose a [https://www.survivalservers.com/services/game_servers/hytale/ Hytale server host] that will fit your needs. | ||
'''Note:''' Hytale has not yet released its public dedicated server download at the time of writing. This guide explains the general process and will be updated with exact filenames and URLs once the official server package and documentation are live. | |||
== Option #1: Renting a Hytale server (see example control panel below!) == | == Option #1: Renting a Hytale server (see example control panel below!) == | ||
Renting from a professional game server provider is the fastest and easiest way to get online. Survival Servers handles hardware, network, DDoS protection, and updates for you. | |||
[[File:Control panel.gif|none|link=https://www.survivalservers.com/sspanel/?game=hytale&trckaff=3881&trckit=WIKI]] | [[File:Control panel.gif|none|link=https://www.survivalservers.com/sspanel/?game=hytale&trckaff=3881&trckit=WIKI]] | ||
[[File:Hytale_game_server.png|none|link=https://www.survivalservers.com/sspanel/?game=hytale&trckaff=3881&trckit=WIKI]] | |||
With a rented Hytale server from Survival Servers you get: | |||
* Custom control panel (start/stop/restart, config editor, backups) | |||
* High-clock dedicated hardware (no VPS) | |||
* NVMe SSD storage | |||
* DDoS protection | |||
* Full FTP / SFTP file access | |||
* Multiple worldwide locations and the ability to switch locations at any time | |||
== Option #2: Creating a Hytale Server From Your Home Computer or Dedicated Server == | == Option #2: Creating a Hytale Server From Your Home Computer or Dedicated Server == | ||
This option is for advanced users who want to host Hytale directly on their own hardware. | |||
=== Server Requirements (expected) === | |||
Hytale’s developers have confirmed that: | |||
* The '''game client''' will launch on Windows first. | |||
* The '''dedicated server''' runs wherever a supported Java runtime (Java 21+/25) is available (for example most Linux distros and Windows). | |||
Exact minimum specs will be provided by Hypixel Studios, but for planning purposes you should assume at least: | |||
; Operating System | |||
: A 64-bit operating system. For example: | |||
:* Windows 10/11 64-bit | |||
:* A modern 64-bit Linux distribution (Ubuntu, Debian, etc.) – recommended for dedicated servers | |||
; CPU | |||
: 64-bit quad-core processor or better (modern Intel / AMD). Higher clock speed helps a lot for large or busy servers. | |||
; Memory (RAM) | |||
: For small private servers (friends & family): | |||
:* 4 GB RAM dedicated to the Hytale server (plus extra for the OS) | |||
: For public or heavily modded servers: | |||
:* 6–8 GB+ dedicated to the Hytale server | |||
; Disk space | |||
: At least 10–20 GB free space is recommended to allow for world growth and backups. | |||
; Java | |||
: A 64-bit Java runtime capable of running Java 21+/25 (for example a current OpenJDK build), unless the official Hytale dedicated server download bundles its own Java runtime. | |||
: | |||
When Hytale publishes official system requirements and server docs, update this section with their exact recommendations. | |||
== Step 1: Fetching Game Server Files == | |||
Once Hytale releases the dedicated server package, you will obtain it from the official Hytale website or launcher. | |||
A typical workflow will look like this: | |||
# Go to the official Hytale website (https://hytale.com) or follow the in-game / launcher instructions for downloading the dedicated server. | |||
# Download the '''Hytale dedicated server''' archive for your operating system (for example a .zip or .tar.gz file). | |||
# Create a folder for your server. Example locations: | |||
#: '''Windows:''' <code>C:\HytaleServer\</code> | |||
#: '''Linux:''' <code>/home/hytale/server</code> | |||
# Extract the downloaded server archive into this folder. | |||
# Run the server once (for example by double-clicking the JAR or using a basic <code>java -jar</code> command) so it can generate its configuration and EULA files. | |||
# If an EULA file is created (for example <code>eula.txt</code>), open it and change <code>eula=false</code> to <code>eula=true</code> after reading and agreeing to the terms. | |||
'''Important:''' The actual filenames (for example <code>hytale-server.jar</code> vs <code>server.jar</code>) and folder structure will be defined by Hypixel Studios. Always follow the official documentation for the exact names. | |||
== Step 2: Setting up a Hytale Dedicated Server Start Script == | |||
To make starting the server easier, you can create a simple script. | |||
=== Windows (.bat file) === | |||
# In your Hytale server folder, create a new text file and name it something like <code>StartHytaleServer.bat</code>. | |||
# Edit the file and add a line similar to: | |||
<pre> | <pre> | ||
@echo off | |||
java -Xms4096M -Xmx4096M -jar hytale-server.jar --nogui | |||
pause | |||
</pre> | </pre> | ||
* Replace <code>hytale-server.jar</code> with the exact server JAR name from the official download. | |||
* Adjust <code>-Xms</code> / <code>-Xmx</code> to match the amount of RAM you want to allocate (for example 2048M for 2 GB). | |||
Save the file and double-click it to start your server. | |||
=== Linux (.sh file) === | |||
# In your Hytale server folder, create a new file named <code>start-hytale-server.sh</code>. | |||
# Add: | |||
[ | <pre> | ||
#!/bin/bash | |||
java -Xms4096M -Xmx4096M -jar hytale-server.jar --nogui | |||
</pre> | |||
# Make it executable: | |||
<pre> | |||
chmod +x start-hytale-server.sh | |||
</pre> | |||
# Start the server with: | |||
<pre> | |||
./start-hytale-server.sh | |||
</pre> | |||
Again, replace <code>hytale-server.jar</code> and memory flags as appropriate. | |||
== Step 3: Port Forwarding and Firewall Rules == | |||
Hytale uses a modern networking stack (QUIC on top of UDP). The exact default port number will be documented by the developers in the server configuration. | |||
General steps: | |||
# Locate the '''port''' setting in the Hytale server configuration file (for example <code>server.yml</code> or <code>server.json</code>). Make note of the port number. | |||
# On the server’s operating system firewall (Windows Firewall, ufw, firewalld, etc.), create an incoming rule to allow traffic on that port over UDP (and any other protocols Hytale requires, per the official docs). | |||
# On your router, set up port forwarding from the internet to your server machine’s local IP address on the same port and protocol. | |||
# If you are unsure how to port forward, [https://portforward.com/ PortForward.com] has guides for many router models. | |||
If your players still cannot connect, check: | |||
* That the server is actually running and listening on the expected port. | |||
* That your ISP is not blocking inbound traffic on that port. | |||
* That no additional firewall (for example antivirus firewall) is blocking the connection. | |||
== Configuring your Hytale Game Server == | |||
Once your server is running, you will see configuration and world files generated in the server folder. | |||
The exact names and formats (for example <code>server.yml</code>, <code>config.json</code>, etc.) will be provided by Hytale’s official documentation, but in general you can expect to configure: | |||
* Server name / MOTD (how the server appears to players) | |||
* Maximum players | |||
* World seed and world settings | |||
* Difficulty and gameplay rules | |||
* Logging, backups, and performance settings | |||
Typical workflow: | |||
# Stop the server. | |||
# Open the main configuration file in a text editor (for example Notepad++ or VS Code). | |||
# Change your settings (server name, max players, etc.). | |||
# Save the file and restart the server. | |||
Survival Servers customers can edit most of these options directly via the web control panel without editing files by hand. | |||
== Locating and Joining your Server == | |||
Once Hytale’s multiplayer UI is finalized, there will generally be two ways to join: | |||
# '''Direct IP''' | |||
#:* Start the Hytale client. | |||
#:* Select the option to join by IP / direct connect. | |||
#:* Enter your server’s IP address or hostname (and port, if different from the default). | |||
#:* Connect. | |||
# '''Server browser (after it is implemented)''' | |||
#:* Open the in-game server browser. | |||
#:* Search or filter by name, tags, or region to find your server. | |||
#:* Click to join. | |||
If you cannot find or join your server: | |||
* Verify the server is running (no crash in the console). | |||
* Double-check your IP/hostname and port. | |||
* Ensure your firewall and router port-forwarding rules are correct. | |||
* Ask a friend on a different network to test connecting to rule out local issues. | |||
== Location of World Save Data == | == Location of World Save Data == | ||
Your world data will be stored in one or more folders inside your Hytale server directory. Common patterns in other games are folders named <code>world</code>, <code>worlds</code>, or similar. | |||
After you have started the server at least once, check your server folder for: | |||
* A world save folder (for example <code>world/</code>) | |||
* Backups (if you or your hosting provider enable them) | |||
Make regular backups of your world folder to avoid data loss in case of corruption or hardware failure. | |||
Survival Servers provides automated backup options directly from the control panel. | |||
== Tools == | == Tools == | ||
: | |||
Hytale is being built with powerful creator tools: | |||
* '''In-game world editing and prefabs''' for fast building and world design. | |||
* A '''Blockbench plugin''' for creating and animating models. | |||
* Server-side modding via plugins and asset packs, with the server code planned to be shared-source after release. | |||
* Official documentation and examples (GitBook, tutorials) planned by the Hytale team. | |||
As Hytale’s official modding and server documentation is released, this section will be expanded with: | |||
* Links to official docs and APIs | |||
* Recommended tools and workflows for running modded Hytale servers | |||
* Best practices for backups, performance tuning, and security | |||
__NOTOC__ | __NOTOC__ | ||
Revision as of 16:29, 23 November 2025
Creating a Hytale game server is an easy process that can be done from either a dedicated server or your home computer. Alternatively, you can choose a Hytale server host that will fit your needs.
Note: Hytale has not yet released its public dedicated server download at the time of writing. This guide explains the general process and will be updated with exact filenames and URLs once the official server package and documentation are live.
Option #1: Renting a Hytale server (see example control panel below!)
Renting from a professional game server provider is the fastest and easiest way to get online. Survival Servers handles hardware, network, DDoS protection, and updates for you.
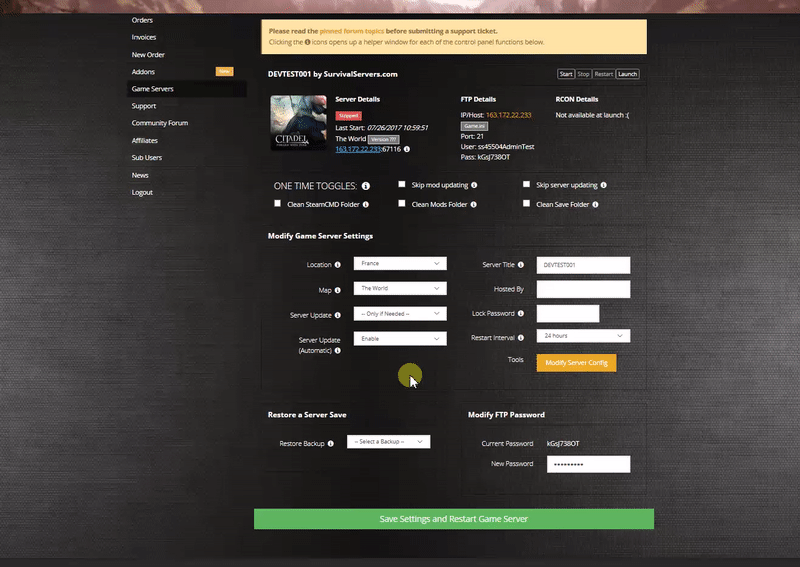
With a rented Hytale server from Survival Servers you get:
- Custom control panel (start/stop/restart, config editor, backups)
- High-clock dedicated hardware (no VPS)
- NVMe SSD storage
- DDoS protection
- Full FTP / SFTP file access
- Multiple worldwide locations and the ability to switch locations at any time
Option #2: Creating a Hytale Server From Your Home Computer or Dedicated Server
This option is for advanced users who want to host Hytale directly on their own hardware.
Server Requirements (expected)
Hytale’s developers have confirmed that:
- The game client will launch on Windows first.
- The dedicated server runs wherever a supported Java runtime (Java 21+/25) is available (for example most Linux distros and Windows).
Exact minimum specs will be provided by Hypixel Studios, but for planning purposes you should assume at least:
- Operating System
- A 64-bit operating system. For example:
- Windows 10/11 64-bit
- A modern 64-bit Linux distribution (Ubuntu, Debian, etc.) – recommended for dedicated servers
- CPU
- 64-bit quad-core processor or better (modern Intel / AMD). Higher clock speed helps a lot for large or busy servers.
- Memory (RAM)
- For small private servers (friends & family):
- 4 GB RAM dedicated to the Hytale server (plus extra for the OS)
- For public or heavily modded servers:
- 6–8 GB+ dedicated to the Hytale server
- Disk space
- At least 10–20 GB free space is recommended to allow for world growth and backups.
- Java
- A 64-bit Java runtime capable of running Java 21+/25 (for example a current OpenJDK build), unless the official Hytale dedicated server download bundles its own Java runtime.
When Hytale publishes official system requirements and server docs, update this section with their exact recommendations.
Step 1: Fetching Game Server Files
Once Hytale releases the dedicated server package, you will obtain it from the official Hytale website or launcher.
A typical workflow will look like this:
- Go to the official Hytale website (https://hytale.com) or follow the in-game / launcher instructions for downloading the dedicated server.
- Download the Hytale dedicated server archive for your operating system (for example a .zip or .tar.gz file).
- Create a folder for your server. Example locations:
- Windows:
C:\HytaleServer\ - Linux:
/home/hytale/server
- Windows:
- Extract the downloaded server archive into this folder.
- Run the server once (for example by double-clicking the JAR or using a basic
java -jarcommand) so it can generate its configuration and EULA files. - If an EULA file is created (for example
eula.txt), open it and changeeula=falsetoeula=trueafter reading and agreeing to the terms.
Important: The actual filenames (for example hytale-server.jar vs server.jar) and folder structure will be defined by Hypixel Studios. Always follow the official documentation for the exact names.
Step 2: Setting up a Hytale Dedicated Server Start Script
To make starting the server easier, you can create a simple script.
Windows (.bat file)
- In your Hytale server folder, create a new text file and name it something like
StartHytaleServer.bat. - Edit the file and add a line similar to:
@echo off
java -Xms4096M -Xmx4096M -jar hytale-server.jar --nogui
pause
- Replace
hytale-server.jarwith the exact server JAR name from the official download. - Adjust
-Xms/-Xmxto match the amount of RAM you want to allocate (for example 2048M for 2 GB).
Save the file and double-click it to start your server.
Linux (.sh file)
- In your Hytale server folder, create a new file named
start-hytale-server.sh. - Add:
#!/bin/bash
java -Xms4096M -Xmx4096M -jar hytale-server.jar --nogui
- Make it executable:
chmod +x start-hytale-server.sh
- Start the server with:
./start-hytale-server.sh
Again, replace hytale-server.jar and memory flags as appropriate.
Step 3: Port Forwarding and Firewall Rules
Hytale uses a modern networking stack (QUIC on top of UDP). The exact default port number will be documented by the developers in the server configuration.
General steps:
- Locate the port setting in the Hytale server configuration file (for example
server.ymlorserver.json). Make note of the port number. - On the server’s operating system firewall (Windows Firewall, ufw, firewalld, etc.), create an incoming rule to allow traffic on that port over UDP (and any other protocols Hytale requires, per the official docs).
- On your router, set up port forwarding from the internet to your server machine’s local IP address on the same port and protocol.
- If you are unsure how to port forward, PortForward.com has guides for many router models.
If your players still cannot connect, check:
- That the server is actually running and listening on the expected port.
- That your ISP is not blocking inbound traffic on that port.
- That no additional firewall (for example antivirus firewall) is blocking the connection.
Configuring your Hytale Game Server
Once your server is running, you will see configuration and world files generated in the server folder.
The exact names and formats (for example server.yml, config.json, etc.) will be provided by Hytale’s official documentation, but in general you can expect to configure:
- Server name / MOTD (how the server appears to players)
- Maximum players
- World seed and world settings
- Difficulty and gameplay rules
- Logging, backups, and performance settings
Typical workflow:
- Stop the server.
- Open the main configuration file in a text editor (for example Notepad++ or VS Code).
- Change your settings (server name, max players, etc.).
- Save the file and restart the server.
Survival Servers customers can edit most of these options directly via the web control panel without editing files by hand.
Locating and Joining your Server
Once Hytale’s multiplayer UI is finalized, there will generally be two ways to join:
- Direct IP
- Start the Hytale client.
- Select the option to join by IP / direct connect.
- Enter your server’s IP address or hostname (and port, if different from the default).
- Connect.
- Server browser (after it is implemented)
- Open the in-game server browser.
- Search or filter by name, tags, or region to find your server.
- Click to join.
If you cannot find or join your server:
- Verify the server is running (no crash in the console).
- Double-check your IP/hostname and port.
- Ensure your firewall and router port-forwarding rules are correct.
- Ask a friend on a different network to test connecting to rule out local issues.
Location of World Save Data
Your world data will be stored in one or more folders inside your Hytale server directory. Common patterns in other games are folders named world, worlds, or similar.
After you have started the server at least once, check your server folder for:
- A world save folder (for example
world/) - Backups (if you or your hosting provider enable them)
Make regular backups of your world folder to avoid data loss in case of corruption or hardware failure.
Survival Servers provides automated backup options directly from the control panel.
Tools
Hytale is being built with powerful creator tools:
- In-game world editing and prefabs for fast building and world design.
- A Blockbench plugin for creating and animating models.
- Server-side modding via plugins and asset packs, with the server code planned to be shared-source after release.
- Official documentation and examples (GitBook, tutorials) planned by the Hytale team.
As Hytale’s official modding and server documentation is released, this section will be expanded with:
- Links to official docs and APIs
- Recommended tools and workflows for running modded Hytale servers
- Best practices for backups, performance tuning, and security