Minecraft Administration
Minecraft administration can be done in many forms and the three most basic ways to do this is by setting up OP / Admin users, maintaining a whitelist, and maintaining a blacklist. - Other administrative techniques and examples will be coming soon!
Contents
Setting up OP / Admin Users
An OP (Operator) account allows full access to commands within Minecraft, such as adding/removing people from the whitelist, changing the weather, time of day, etc. (For a list of commands, go here.) To setup yourself as an OP, you will need FTP access to the server as well as the UUID (Universally Unique IDentifier) for your account.
- Information on FTP access can be found on the FTP Access page.
Follow these instructions on how to setup your account as an OP as well as setup a white-list.
--
- Stop your server.
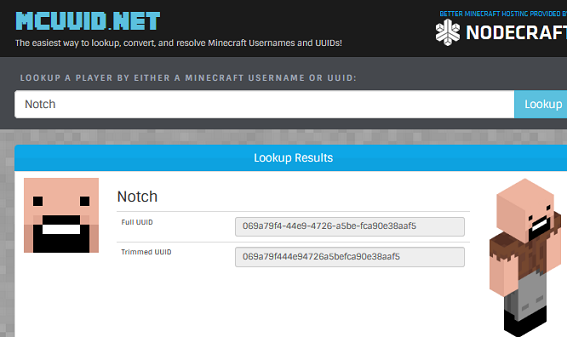
- Retrieve the UUID for your account. Go to this page UUID Finder. Type in the account name for your Minecraft account and you will a page similar to the image below.
- Copy the value for the Full UUID and place it in a notepad on your computer. We will use this later when editing the files for your server.
- You will need to open the following file in your FTP folder:
- ops.json - The file contains information on which accounts are granted OP / Admin access.
- In the ops.json file you will need add your UUID, name, permission level, and if you can join despite the number of players on the server. Using Notch's info, it will look like this.
[
  {
    "uuid": "069a79f4-44e9-4726-a5be-fca90e38aaf5",
    "name": "Notch",
    "level": 4,
    "bypassesPlayerLimit": false
  }
]
6. Once you are done making changes, save the file, and start the server up.
Whitelisting
To prevent unauthorized users from joining your server, a "white list" will need to be created. A whitelist is similar to a security guard checking if your name is on the list before you're allowed into a party. Setting up a whitelist will help prevent your server from being the victim of griefers and other unwanted guests.
1. Once you are connected to your server via FTP, you will need to locate two files.
- server.properties - Main configuration file for your server
- whitelist.json - This file contains information on who is or isn't allowed on the server.
2. In the server.properties file, you will need to change the value of white-list from false to true.
In the whitelist.json file, you will need to add your UUID and account name. Using Notch's info, it will look like this.
[
  {
    "uuid": "069a79f4-44e9-4726-a5be-fca90e38aaf5",
    "name": "Notch"
  },
]
Blacklisting
Adding an OP Account and Whitelist Setup
Managing Whitelists and Blacklists in Game
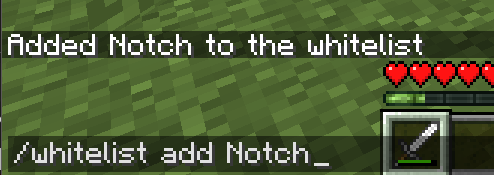
Once you have operator permissions and are on the whitelist, you are now able to add/remove players from the whitelist with ease. Here's an example of adding and removing Notch from the whitelist while in the game.
Please note that unless you add players to your whitelist, they will be unable to join and will receive a message indicating they are not on the whitelist.
(This information is setting up OP via RCON instead of FTP and will be completed and merged into the information above soon)
How to OP your character
- You will want to first get a working rcon tool for minecraft
- More info related to this topic Here
- Once you are logged into your Rcon tool type the following into it
- OP Username (with username being the name your character uses in game)
- Example: OP SurvivalServers
- Once you run this command in the rcon window it will then spit back text stating your player is now OP'd
- Log in game and test out some admin commands
Share your opinion


