NEW! Servers for GTA V (FiveM).. Use Coupon SPOOK, take 20% off Click here to order now at SurvivalServers.com
Space Engineers: Server Configuration
Contents
Changing World Settings
World settings can be changed and the method used depends on if you have an existing world or if you will be starting a new world.
New World
- Access your server file directory by using FTP.
- Navigate to GamerServerID\Instance\Saves.
- Delete any existing worlds.
- Navigate to GamerServerID\Instance\SpaceEngineers-Dedicated.cfg.
- Edit this file and any settings to your liking.
- Save your changes and restart your server.
- A new world will now be generated with your new settings.
Existing World
- Access your server file directory by using FTP.
- Navigate to GameServerID\Instance\Saves\SAVENAME\Sandbox_config.sbc
- Edit this file and any settings to your liking.
- Save your changes and restart your server.
- Your existing world will now be updated with your new settings.
Creative or Survival
To change the game mode between Creative and Survival, please do the following:
- Stop your server from the panel.
- Log in to FTP using WinSCP (a free FTP software) using the connection details found in the "FTP Details" section of the game server control panel. Download link for WinSCP here http://winscp.net/eng/download.php
- For new worlds, open up the SpaceEngineers-Dedicated.cfg which can be found in the "Instance\" directory
- For existing worlds, open up your current saves "Sandbox_config.sbc" which can be found in the "Instance\YOUR_SAVE" directory
- Search for <GameMode> in both files and change what is found inside the <GameMode>XXXXXX</GameMode> to one of the two choices below!
- For Survival it should look like: <GameMode>Survival</GameMode>
- For Creative it should look like: <GameMode>Creative</GameMode> - Save the files and re-upload them to their appropriate place on the server
- Start the server
Mod Installation
Mods can be installed in two ways. They can be added in the control panel or added manually using FTP.
Control Panel Installation
- Add all Mod IDs to the Mod ID(s) box
- Press the green button "Save Settings and Restart Game Server"
- If you previously ran the server or had mods before hand you need to do the next steps
- Use FTP to navigate into your servers "Instance\Save\YOUR_SAVE" folder and delete the sandbox_config.sbc
- Then after that, go ahead and do step 2.
Manual Installation
- Get the Mod ID from the steam page URL
- Using FTP, open up the Sandbox_config.sbc, which can be found in the "Instance\Saves\YOUR_CURRENT_SAVE_NAME" directory
- Search for Mods
- Setup the proper mods element and change <Mods />
- Add an XML item for each mod, it will look like this
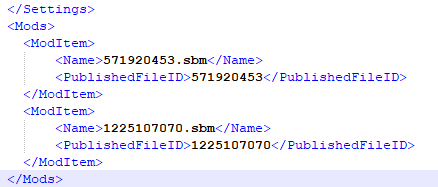
- Here is an example of how it should look when you add the mod name and mod id
- Here is an example of using multiple mods
- Once you've finished adding the mods, make sure to save the file!
Share your opinion


