How to Create a Hytale Server Guide: Difference between revisions
No edit summary |
|||
| (10 intermediate revisions by 2 users not shown) | |||
| Line 1: | Line 1: | ||
Creating a Hytale game server is an easy process that can be done from either a dedicated server or your home computer. | Creating a Hytale game server is an easy process that can be done from either a dedicated server or your home computer. Alternatively, you can choose a [https://www.survivalservers.com/services/game_servers/hytale/ Hytale server host] that will fit your needs. | ||
== Option #1: Renting a Hytale server (see example control panel below!) == | == Option #1: Renting a Hytale server (see example control panel below!) == | ||
Renting from a professional game server provider is the fastest and easiest way to get online. Survival Servers handles hardware, network, DDoS protection, and updates for you. | |||
= | [[File:Control panel.gif|none|link=https://www.survivalservers.com/sspanel/?game=hytale&trckaff=3881&trckit=WIKI]] | ||
[[File:Hytale_game_server.png|none|link=https://www.survivalservers.com/sspanel/?game=hytale&trckaff=3881&trckit=WIKI]] | |||
With a rented Hytale server from Survival Servers you get: | |||
* Custom control panel (start/stop/restart, config editor, backups) | |||
* High-clock dedicated hardware (no VPS) | |||
* NVMe SSD storage | |||
* DDoS protection configured for UDP/QUIC traffic | |||
* Full FTP / SFTP file access | |||
* Multiple worldwide locations and the ability to switch locations at any time | |||
== Option #2: Host Your Own Hytale Server == | |||
Want to run your own Hytale server at home or on your own hardware? This guide will walk you through everything step by step. | |||
{{#ev:youtube|VaU4HarMbp8|640|center}} | |||
=== What You'll Need === | |||
==== Computer Requirements ==== | |||
= | {| class="wikitable" | ||
|- | |||
! What !! Minimum !! Recommended | |||
|- | |||
| RAM || 4 GB || 6-8 GB | |||
|- | |||
| CPU || Modern 64-bit processor || Quad-core or better | |||
|- | |||
| Storage || 10 GB free space || 20+ GB SSD | |||
|- | |||
| Operating System || Windows 10/11 or Linux (64-bit) || Same | |||
|} | |||
==== Software Requirements ==== | |||
* '''Java 25''' - This is required to run the server. Download it free from [https://adoptium.net/ Adoptium] | |||
To check if Java is installed correctly, open Command Prompt (Windows) or Terminal (Linux/Mac) and type: | |||
<pre>java --version</pre> | |||
You should see something like: | |||
<pre>openjdk 25.0.1 2025-10-21 LTS</pre> | |||
=== Step 1: Get the Server Files === | |||
There are two ways to get the Hytale server files: | |||
''' | '''Method A: Copy from your Hytale game installation (easiest for beginners)''' | ||
# Install and run the Hytale Launcher on your computer | |||
# Navigate to your Hytale installation folder: | |||
#* '''Windows:''' <code>%appdata%\Hytale\install\release\package\game\latest</code> | |||
#* '''Linux:''' <code>~/.local/share/Hytale/install/release/package/game/latest</code> | |||
#* '''Mac:''' <code>~/Application Support/Hytale/install/release/package/game/latest</code> | |||
# Copy the <code>Server</code> folder and <code>Assets.zip</code> to wherever you want to run your server | |||
'''Method B: Use the Hytale Downloader tool (best for keeping updated)''' | |||
[ | # Download the [https://downloader.hytale.com/hytale-downloader.zip Hytale Downloader] from the official download site | ||
# Extract and run the downloader - it will prompt you to authenticate with your Hytale account | |||
# The downloader fetches the latest server files and makes updating easy when new versions release | |||
=== Step 2: Start the Server for the First Time === | |||
# Create a new folder for your server (example: <code>C:\HytaleServer</code>) | |||
# Place the server files (<code>Server</code> folder and <code>Assets.zip</code>) in this folder | |||
# Open Command Prompt or Terminal in that folder | |||
# Run this command: | |||
<pre>java -jar Server\HytaleServer.jar --assets Assets.zip</pre> | |||
On Linux/Mac, use forward slashes: <code>java -jar Server/HytaleServer.jar --assets Assets.zip</code> | |||
The server will start up and create all its configuration files. You'll see text scrolling in the window as it loads. | |||
=== Step 3: Authenticate Your Server === | |||
''' | Before players can join, you need to link your server to your Hytale account: | ||
# In the server console, type: <code>/auth login device</code> | |||
# You'll see a code and a link appear | |||
# Open the link in your web browser and enter the code | |||
# Log in with your Hytale account | |||
# Once approved, you'll see "Authentication successful!" in the console | |||
Your server is now ready to accept players! | |||
=== Step 4: Set Up Port Forwarding (Required for Friends to Join) === | |||
'''Important:''' Hytale uses '''UDP port 5520''' by default. This is different from many games that use TCP. | |||
==== If you're hosting at home: ==== | |||
# Find your computer's local IP address (usually starts with 192.168) | |||
# Log into your router's admin page (usually http://192.168.1.1 or http://192.168.0.1) | |||
# Find the Port Forwarding section | |||
# Add a new rule: | |||
#* '''Protocol:''' UDP (not TCP!) | |||
#* '''External Port:''' 5520 | |||
#* '''Internal Port:''' 5520 | |||
#* '''Internal IP:''' Your computer's local IP | |||
# Save the settings | |||
If you need help with your specific router, [https://portforward.com/ PortForward.com] has guides for most router models. | |||
==== Firewall Settings ==== | |||
You may also need to allow the port through your firewall: | |||
'''Windows:''' | |||
# Open Windows Defender Firewall | |||
# Click "Advanced settings" | |||
# Click "Inbound Rules" then "New Rule" | |||
# Select "Port" > "UDP" > enter "5520" | |||
# Allow the connection and give it a name like "Hytale Server" | |||
'''Linux (ufw):''' | |||
<pre>sudo ufw allow 5520/udp</pre> | |||
=== Step 5: Allocate More RAM (Optional but Recommended) === | |||
By default, Java might not use enough memory. To give your server more RAM, use these flags when starting: | |||
{| class="wikitable" | |||
|- | |||
! Your Available RAM !! Command to Use | |||
|- | |||
| 4 GB || <code>java -Xms3G -Xmx3G -jar Server\HytaleServer.jar --assets Assets.zip</code> | |||
|- | |||
| 6 GB || <code>java -Xms5G -Xmx5G -jar Server\HytaleServer.jar --assets Assets.zip</code> | |||
|- | |||
| 8 GB || <code>java -Xms7G -Xmx7G -jar Server\HytaleServer.jar --assets Assets.zip</code> | |||
|} | |||
'''Tip:''' Always leave about 1 GB for Windows/Linux to use. | |||
=== Create a Start Script (Makes Life Easier) === | |||
Instead of typing the command every time, create a script file: | |||
'''Windows - Create <code>start.bat</code>:''' | |||
<pre>@echo off | |||
java -Xms4G -Xmx4G -jar Server\HytaleServer.jar --assets Assets.zip | |||
pause</pre> | |||
'''Linux - Create <code>start.sh</code>:''' | |||
<pre>#!/bin/bash | |||
java -Xms4G -Xmx4G -jar Server/HytaleServer.jar --assets Assets.zip</pre> | |||
Then make it executable: <code>chmod +x start.sh</code> | |||
Double-click the script to start your server! | |||
== Understanding Your Server Files == | |||
After running the server, you'll see these folders and files: | |||
{| class="wikitable" | |||
|- | |||
! File/Folder !! What It Does | |||
|- | |||
| <code>Server/</code> || Contains HytaleServer.jar (the server executable) | |||
|- | |||
| <code>Assets.zip</code> || Game assets required by the server | |||
|- | |||
| <code>config.json</code> || Main server settings (server name, max players, etc.) | |||
|- | |||
| <code>universe/</code> || Your world saves and player data | |||
|- | |||
| <code>mods/</code> || Put mod files here to add them to your server | |||
|- | |||
| <code>logs/</code> || Server logs for troubleshooting | |||
|- | |||
| <code>bans.json</code> || List of banned players | |||
|- | |||
| <code>whitelist.json</code> || List of allowed players (if whitelist is enabled) | |||
|- | |||
| <code>permissions.json</code> || Player permissions and ranks | |||
|} | |||
'''Important:''' Always stop your server before editing configuration files! | |||
=== Step 5: Changing any Server Settings === | |||
You can find your server.json in the root directory as well as a server.json in the /universe/worlds/Orbis/server.json - more details here: | |||
* [[Hytale_Advanced_Server_Configuration|Hytale: Advanced Server Configuration]] | |||
== Quick Reference == | |||
{| class="wikitable" | |||
|- | |||
! Task !! Command | |||
|- | |||
| Start server (basic) || <code>java -jar Server\HytaleServer.jar --assets Assets.zip</code> | |||
|- | |||
| Start with 4GB RAM || <code>java -Xms4G -Xmx4G -jar Server\HytaleServer.jar --assets Assets.zip</code> | |||
|- | |||
| Use a different port || <code>java -jar Server\HytaleServer.jar --assets Assets.zip --bind 0.0.0.0:25565</code> | |||
|- | |||
| See all options || <code>java -jar Server\HytaleServer.jar --help</code> | |||
|} | |||
== Tips for Better Performance == | |||
* '''Lower view distance''' - The default view distance uses a lot of RAM. Consider reducing it in your config if you have performance issues | |||
* '''Use an SSD''' - Solid state drives help the server load chunks faster | |||
* '''Monitor your resources''' - Watch CPU and RAM usage while players are online to understand what your server needs | |||
* '''Keep Java updated''' - Always use Java 25 as recommended by Hytale | |||
== See Also == | |||
* [Hytale Advanced Server Configuration] | |||
* [[How to Join a Hytale Server]] | |||
* [[How to Install Mods on a Hytale Server]] | |||
* [https://hytale.com/ Official Hytale Website] | |||
* [https://support.hytale.com/ Hytale Support & Documentation] | |||
__NOTOC__ | __NOTOC__ | ||
Latest revision as of 07:39, 15 January 2026
Creating a Hytale game server is an easy process that can be done from either a dedicated server or your home computer. Alternatively, you can choose a Hytale server host that will fit your needs.
Option #1: Renting a Hytale server (see example control panel below!)
Renting from a professional game server provider is the fastest and easiest way to get online. Survival Servers handles hardware, network, DDoS protection, and updates for you.
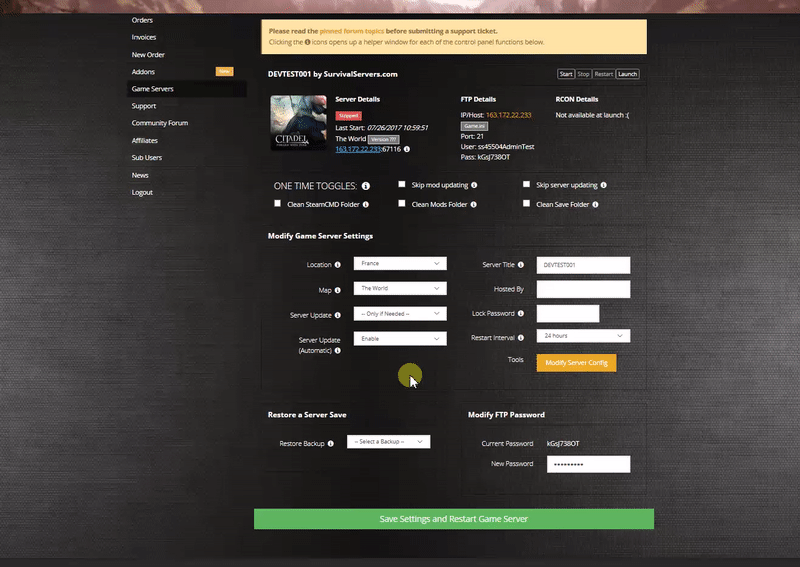
With a rented Hytale server from Survival Servers you get:
- Custom control panel (start/stop/restart, config editor, backups)
- High-clock dedicated hardware (no VPS)
- NVMe SSD storage
- DDoS protection configured for UDP/QUIC traffic
- Full FTP / SFTP file access
- Multiple worldwide locations and the ability to switch locations at any time
Option #2: Host Your Own Hytale Server
Want to run your own Hytale server at home or on your own hardware? This guide will walk you through everything step by step.
What You'll Need
Computer Requirements
| What | Minimum | Recommended |
|---|---|---|
| RAM | 4 GB | 6-8 GB |
| CPU | Modern 64-bit processor | Quad-core or better |
| Storage | 10 GB free space | 20+ GB SSD |
| Operating System | Windows 10/11 or Linux (64-bit) | Same |
Software Requirements
- Java 25 - This is required to run the server. Download it free from Adoptium
To check if Java is installed correctly, open Command Prompt (Windows) or Terminal (Linux/Mac) and type:
java --version
You should see something like:
openjdk 25.0.1 2025-10-21 LTS
Step 1: Get the Server Files
There are two ways to get the Hytale server files:
Method A: Copy from your Hytale game installation (easiest for beginners)
- Install and run the Hytale Launcher on your computer
- Navigate to your Hytale installation folder:
- Windows:
%appdata%\Hytale\install\release\package\game\latest - Linux:
~/.local/share/Hytale/install/release/package/game/latest - Mac:
~/Application Support/Hytale/install/release/package/game/latest
- Windows:
- Copy the
Serverfolder andAssets.zipto wherever you want to run your server
Method B: Use the Hytale Downloader tool (best for keeping updated)
- Download the Hytale Downloader from the official download site
- Extract and run the downloader - it will prompt you to authenticate with your Hytale account
- The downloader fetches the latest server files and makes updating easy when new versions release
Step 2: Start the Server for the First Time
- Create a new folder for your server (example:
C:\HytaleServer) - Place the server files (
Serverfolder andAssets.zip) in this folder - Open Command Prompt or Terminal in that folder
- Run this command:
java -jar Server\HytaleServer.jar --assets Assets.zip
On Linux/Mac, use forward slashes: java -jar Server/HytaleServer.jar --assets Assets.zip
The server will start up and create all its configuration files. You'll see text scrolling in the window as it loads.
Step 3: Authenticate Your Server
Before players can join, you need to link your server to your Hytale account:
- In the server console, type:
/auth login device - You'll see a code and a link appear
- Open the link in your web browser and enter the code
- Log in with your Hytale account
- Once approved, you'll see "Authentication successful!" in the console
Your server is now ready to accept players!
Step 4: Set Up Port Forwarding (Required for Friends to Join)
Important: Hytale uses UDP port 5520 by default. This is different from many games that use TCP.
If you're hosting at home:
- Find your computer's local IP address (usually starts with 192.168)
- Log into your router's admin page (usually http://192.168.1.1 or http://192.168.0.1)
- Find the Port Forwarding section
- Add a new rule:
- Protocol: UDP (not TCP!)
- External Port: 5520
- Internal Port: 5520
- Internal IP: Your computer's local IP
- Save the settings
If you need help with your specific router, PortForward.com has guides for most router models.
Firewall Settings
You may also need to allow the port through your firewall:
Windows:
- Open Windows Defender Firewall
- Click "Advanced settings"
- Click "Inbound Rules" then "New Rule"
- Select "Port" > "UDP" > enter "5520"
- Allow the connection and give it a name like "Hytale Server"
Linux (ufw):
sudo ufw allow 5520/udp
Step 5: Allocate More RAM (Optional but Recommended)
By default, Java might not use enough memory. To give your server more RAM, use these flags when starting:
| Your Available RAM | Command to Use |
|---|---|
| 4 GB | java -Xms3G -Xmx3G -jar Server\HytaleServer.jar --assets Assets.zip
|
| 6 GB | java -Xms5G -Xmx5G -jar Server\HytaleServer.jar --assets Assets.zip
|
| 8 GB | java -Xms7G -Xmx7G -jar Server\HytaleServer.jar --assets Assets.zip
|
Tip: Always leave about 1 GB for Windows/Linux to use.
Create a Start Script (Makes Life Easier)
Instead of typing the command every time, create a script file:
Windows - Create start.bat:
@echo off
java -Xms4G -Xmx4G -jar Server\HytaleServer.jar --assets Assets.zip
pause
Linux - Create start.sh:
#!/bin/bash
java -Xms4G -Xmx4G -jar Server/HytaleServer.jar --assets Assets.zip
Then make it executable: chmod +x start.sh
Double-click the script to start your server!
Understanding Your Server Files
After running the server, you'll see these folders and files:
| File/Folder | What It Does |
|---|---|
Server/ |
Contains HytaleServer.jar (the server executable) |
Assets.zip |
Game assets required by the server |
config.json |
Main server settings (server name, max players, etc.) |
universe/ |
Your world saves and player data |
mods/ |
Put mod files here to add them to your server |
logs/ |
Server logs for troubleshooting |
bans.json |
List of banned players |
whitelist.json |
List of allowed players (if whitelist is enabled) |
permissions.json |
Player permissions and ranks |
Important: Always stop your server before editing configuration files!
Step 5: Changing any Server Settings
You can find your server.json in the root directory as well as a server.json in the /universe/worlds/Orbis/server.json - more details here:
Quick Reference
| Task | Command |
|---|---|
| Start server (basic) | java -jar Server\HytaleServer.jar --assets Assets.zip
|
| Start with 4GB RAM | java -Xms4G -Xmx4G -jar Server\HytaleServer.jar --assets Assets.zip
|
| Use a different port | java -jar Server\HytaleServer.jar --assets Assets.zip --bind 0.0.0.0:25565
|
| See all options | java -jar Server\HytaleServer.jar --help
|
Tips for Better Performance
- Lower view distance - The default view distance uses a lot of RAM. Consider reducing it in your config if you have performance issues
- Use an SSD - Solid state drives help the server load chunks faster
- Monitor your resources - Watch CPU and RAM usage while players are online to understand what your server needs
- Keep Java updated - Always use Java 25 as recommended by Hytale
See Also
- [Hytale Advanced Server Configuration]
- How to Join a Hytale Server
- How to Install Mods on a Hytale Server
- Official Hytale Website
- Hytale Support & Documentation