Database Backup and Restore: Difference between revisions
Jump to navigation
Jump to search
(Created page with " == DB Backup and Restore Tool == <em>This tool creates database backups of your server every 30 minutes of EVERY day for 3 days straight, and discards each backup indi...") |
No edit summary |
||
| Line 3: | Line 3: | ||
== DB Backup and Restore Tool == | == DB Backup and Restore Tool == | ||
This tool creates database backups of your server every 30 minutes of EVERY day for 3 days straight, and discards each backup individually at the end of 72 hour period. | |||
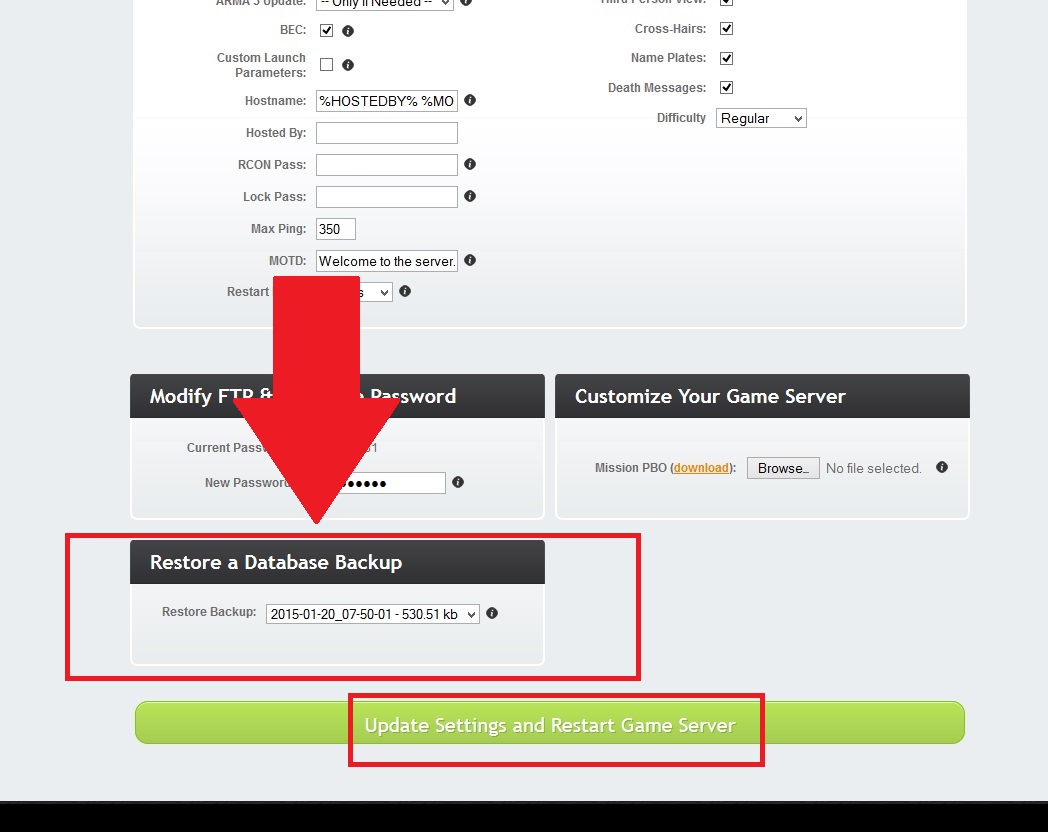
'''Step 1:''' Open your Game server control panel, scroll to the bottom left and choose the restoration point from the drop down list.<br> See the photo below for help. | |||
'''Step 2:''' Press the big green button to restore a database. IMPORTANT: This will wipe your server.cfg to a default server.cfg, please <br> make a backup if you made any changes to that file | |||
[[File:DB Restore.jpg]] | [[File:DB Restore.jpg]] | ||
| Line 15: | Line 17: | ||
== Export and Import Databases with PhpRedisAdmin == | == Export and Import Databases with PhpRedisAdmin == | ||
This is a web browser database tool, that allows you to export and import your database.<br> | |||
This can be used as an alternative to our DB restore tool mentioned above. | |||
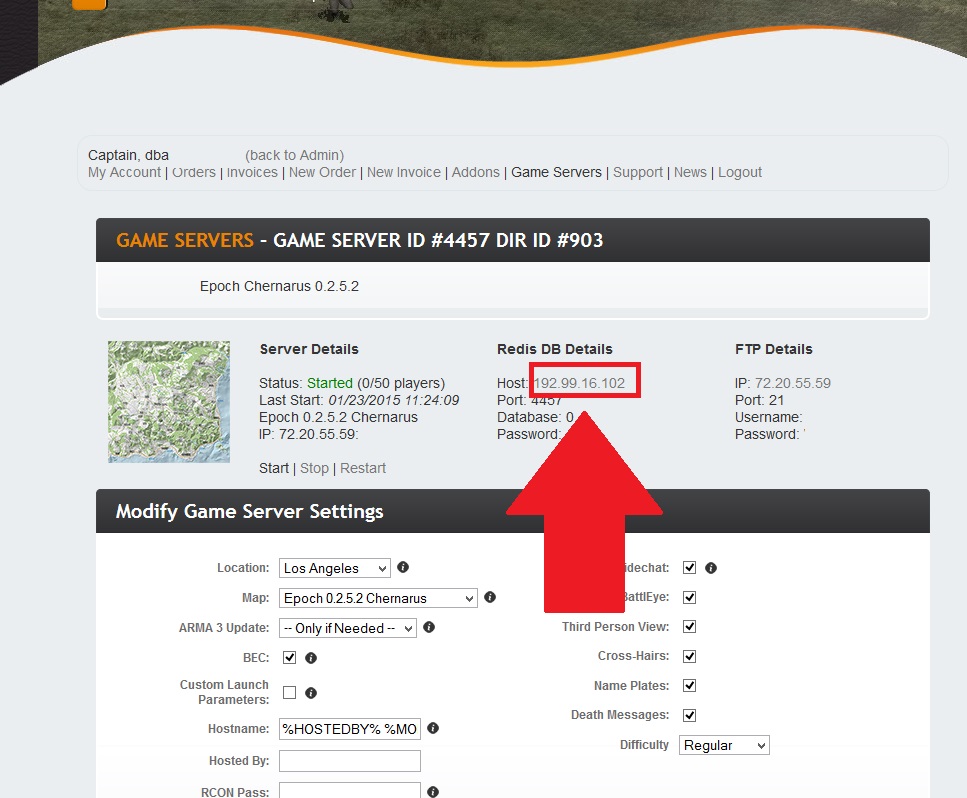
'''Step 1:''' Open your Game server control panel, and at the top/middle, click on the host IP address underneath where it says "Redis DB Details".<br> This will take you to a new page in the web browser. See photo 1 below for help. | |||
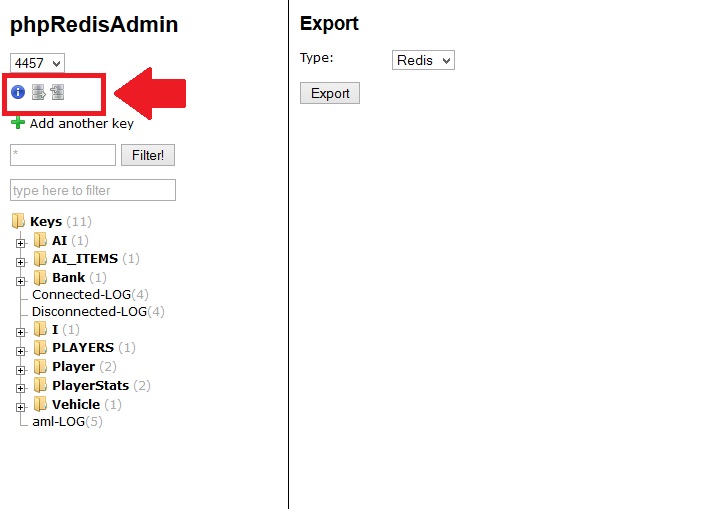
'''Step 2:''' Click the small silver export icon in the upper left corner. See photo 2 below for help. | |||
'''Step 3:''' Click Export on the right, and then copy / paste all of the data into Notepad++ or Notepad. '''IMPORTANT''': If you save a copy of the <br> exported data, it will help you stay organized if you make a new folder on your computer that is labelled with the DATE of the backup,<br> this way you can easily restore data from a certain time or day. | |||
Photo #1: | '''Step 4:''' Click the small silver Import icon in the upper left corner. Paste the data to re-import it and click the Import button below the text box. | ||
Photo #1:<br> | |||
[[File:PhpRedisAdmin1.jpg]] | [[File:PhpRedisAdmin1.jpg]] | ||
<br><br> | |||
Photo #2: | Photo #2:<br> | ||
[[File:PhpRedisAdmin2.jpg]] | [[File:PhpRedisAdmin2.jpg]] | ||
---- | ---- | ||
Revision as of 12:51, 23 January 2015
DB Backup and Restore Tool
This tool creates database backups of your server every 30 minutes of EVERY day for 3 days straight, and discards each backup individually at the end of 72 hour period.
    Step 1: Open your Game server control panel, scroll to the bottom left and choose the restoration point from the drop down list.
            See the photo below for help.
    Step 2: Press the big green button to restore a database. IMPORTANT: This will wipe your server.cfg to a default server.cfg, please
            make a backup if you made any changes to that file
Export and Import Databases with PhpRedisAdmin
This is a web browser database tool, that allows you to export and import your database.
This can be used as an alternative to our DB restore tool mentioned above.
    Step 1: Open your Game server control panel, and at the top/middle, click on the host IP address underneath where it says "Redis DB Details".
            This will take you to a new page in the web browser.  See photo 1 below for help.
Step 2: Click the small silver export icon in the upper left corner. See photo 2 below for help.
    Step 3: Click Export on the right, and then copy / paste all of the data into Notepad++ or Notepad. IMPORTANT: If you save a copy of the
            exported data, it will help you stay organized if you make a new folder on your computer that is labelled with the DATE of the backup,
            this way you can easily restore data from a certain time or day.
Step 4: Click the small silver Import icon in the upper left corner. Paste the data to re-import it and click the Import button below the text box.


